Adding the Repository
This feature is in BETA
The VCC integration will work best with prefab based customization, such as clothing packs, VRCFury prefabs and props.
If you intend of heavily modifying the Bunnias files, such as the FBX and animator or are uncomfortable with prefab variants you should probably use the Unity Package installation.
If you run into any troubles with the creator companion, please reach out to me on discord! I’ve tried my best to make this system as reliable and unobtrusive as possible and would like to make it even better!
Thank you!
Click the Add to VRChat Creator Companion from the Gumroad page. This might take a few seconds to load, but should automatically open your creator companion and add the repository.

This repository is specific to your Gumroad account and will lock itself to your creator companion! Please do not share it or you will lock yourself out!
Your Creator Companion should open to a screen like this, click I understand, Add Repository
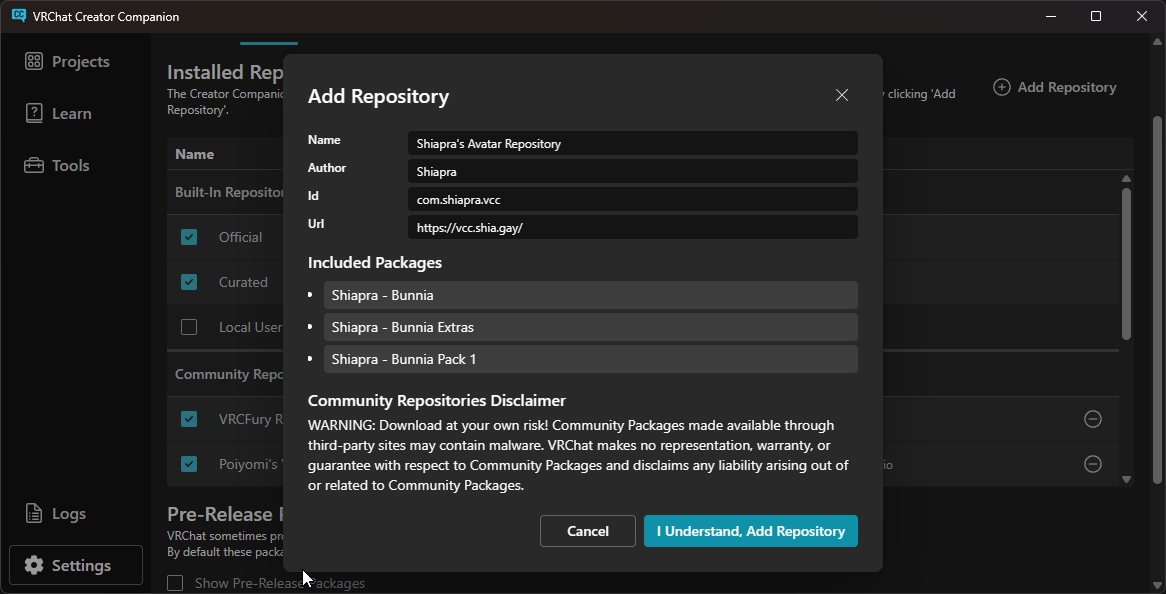
Depending on how many repositories you have installed, you might need to scroll down to see it, but you should see my repository added to the bottom.

Having Issues?
Sometimes the creator companion can be buggy when opening repository links, If you’re having issues with the companion opening, then closing or if its not taking you to the repository page:
Try closing the creator companion and clicking the link again.
If the button still doesn’t work, the VRChat Creator Companion or Windows might not have registered the URI to open Creator Companion links properly.
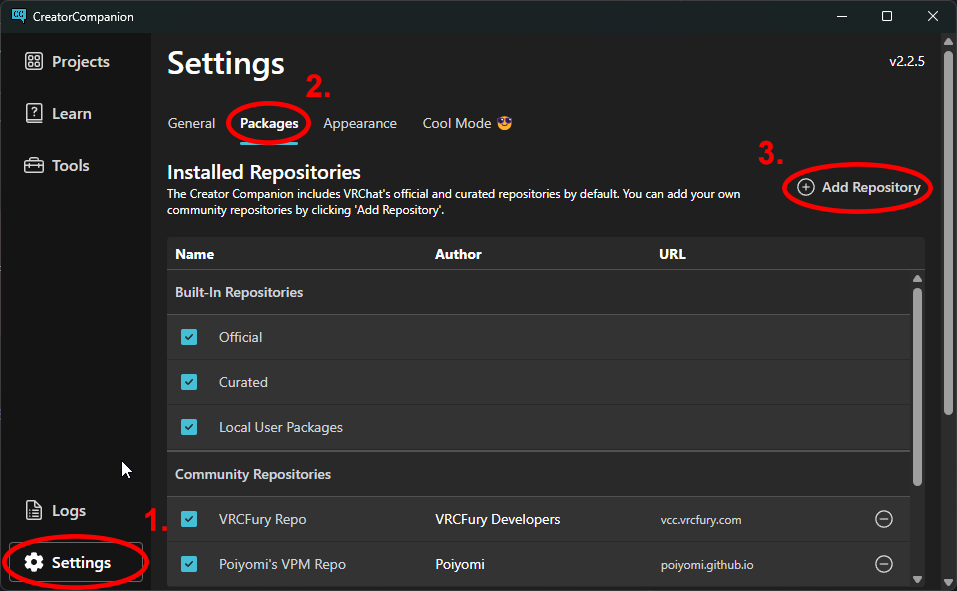
You can add the repository manually buy going to the settings page and adding this URL followed by your product key found at the bottom of the Gumroad page
https://vcc.shia.gay/?license_key=
Adding the Bunnia to your project
Adding the Bunnia is just like adding VRCFury and Poiyomi Navigate back to the Projects tab and select Manage Project on your project.

Click the Plus Icon next to the Shia Bunnia, VRChat Creator Companion will automatically add these to your project
If you add the Shiapra - Bunnia Pack 1 it will automatically add the Shiapra - Bunnia package

Receiving Errors?
The creator companion will throw an error if it can not find the required dependencies for VRCFury and Poiyomi. Unfortunately this isn’t very clear, displaying a small error message on the bottom of your Companion.
If you haven’t added the VRCFury and Poiyomi repositories to your Creator Companion, you’ll need to do that
If you’ve added the required repositories to your Creator Companion, but are still receiving errors, please reach out to me on discord! As I only have my machine to test on, getting information about issues on other peoples machines will help me improve this!
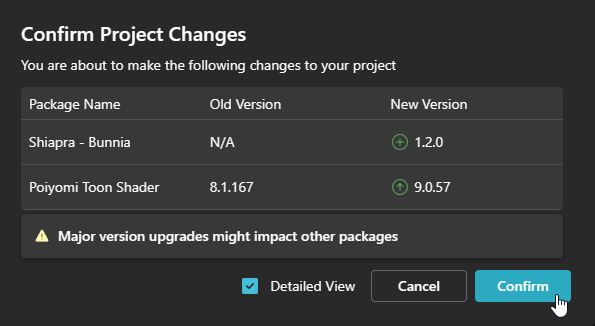
If you have outdated dependencies, the Creator Companion will ask you to update them, Click Confirm
Once they are installed they should both have a Red Remove icon next to them.

Scroll up and Click Open Project

Poiyomi Pro
A Note regarding Poiyomi Pro
If you are intending on using Poiyomi Pro, VRCFury will prevent you from having both the Poiyomi Toon VCC Package and Poiyomi Pro Unity Package installed simultaneously.
You will need to use a Beta version of the Bunnia located as a Pre-Release Package that has no dependency requirements.
If you do not already have Pre-Release Packages enabled:
- Open the Settings screen.
- Switch to the “Packages” tab.
- Scroll down to the Heading “Pre-Release Packages” and check the box next to “Show Pre-Release Packages”.
You will then find a Beta version of the Bunnia under the Versions of the package.
Finding the Files
Once you’ve opened your project, you’ll notice there’s no Assets/Shia_Bunnia folder.
Package files are stored in a separate directory.
Navigate to The Packages Folder and select the Shia Bunnia Package

This only needs to be done once per package
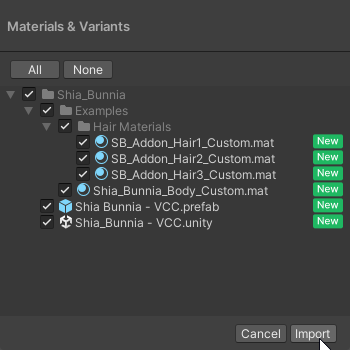
Import the Unity Package labeled
Materials & VaraintsThis will put a Prefab Variant and Scene in your assets folder that will link back to the avatar in the Packages folder.
Do this again for any additional packages like Clothing Packs
You’ll now see a folder called Shia_Bunnia under Assets. Inside are the Pre-Configured Unity Scenes, Materials and Prefab Variants of the model.
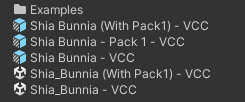
The model is now accessible by opening one of the scene files, or adding the prefab to your existing scene.
Only want to change textures?
If you just wish to change your textures and continue to uploading, or you are already familiar with Prefab Variants.
Prefab Variants & Modifications
The Bunnia is designed around Prefabs and Prefab Variants, and allows a lot of flexibility modifying your model!
You do not need to utilize Prefab Variants to use the model, you can also have separate scenes with your modifications in each if you’re more familiar/comfortable with that!
Do not modify anything in the Packages folder!
You should never modify or add files in the Packages folders, these files will ALL be replaced by the VCC during updates. Instead, modify the prefab variants in the Assets folders.
Making Prefab Variants
This is not necessary for setting up the model.
When making a Prefab Variant, start with the Shia Bunnia - VCC Prefab, this should be considered Your Custom Variant
If you’re adding something like a clothing pack, once you’re done drag and drop the prefab from your Hierarchy, into the Project explorer.
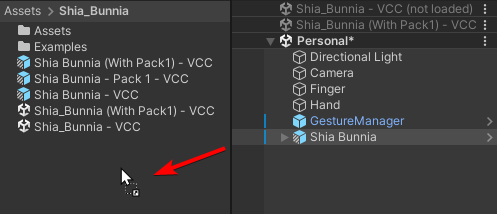
When unity asks, click Prefab Variant
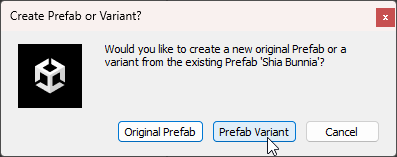
Congrats! You now have a Prefab Variant of your Model! Any changes you make to Your Custom Variant will now automatically flow down into your new Variant .
Examples
The coolest thing I find with prefab variants is the ability to make different versions of your avatar without having to replicate changes across many different versions.
If you want to make different versions of your model for events like Furality or Props that might reduce your performance ranking, you can create a variant and modify that, this will allow any future edits you make to your base avatar (Such as Textures) automatically flow downstream to your other versions.
flowchart TD
BP[Shia Bunnia Package] --> PV[Your Custom Variant]
PV --> FA[Furality Outfit Variant]
PV --> NO[Clothing Outfit Variant]
PV --> GO[Cool Prop Variant]
Modifications & Overrides
If you want to modify something like Physbone settings, You should modify this on your Custom Variant and apply it as an override. This means your changes will automatically propagate down to your other variants and wont be changed in an update.
To make Overrides, right click on the change you’ve made and Apply it as an Override in Shia Bunnia - VCC or Your Custom Variant
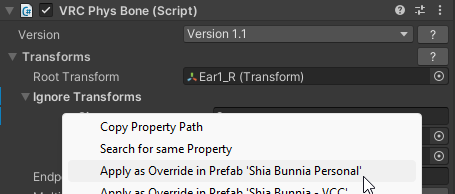
Or for Objects in the Hierarchy Added GameObject > Apply as Override

Your Override will now stay the same even after an update!
Materials
Included are copies of the materials from the packages folder that you can modify and apply your textures to without having to worry about them being replaced. These are already applied to the prefab variants you imported
Store your textures in
AssetsnotPackages
You can modify the materials by selecting the Body in the Inspector window or the Material file in the Project tab.

Before Upload:
Before Uploading
This avatar is ALMOST Ready to Upload,
For Performance reasons the hair options for the avatar have to be chosen before upload. There is no menu to enable or disable each hair in game. (This is intentional)
Navigate under the Characters Hierarchy Shia Bunnia > Hair to select a hairstyle.
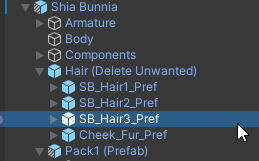
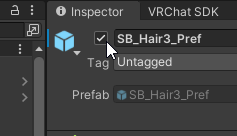
By default, all Hairstyles are Enabled. Using the checkbox in the “Inspector” menu, toggle between the different hairstyles.
Important!
Toggling off the hairstyles will still upload them! To not affect performance rank, you will need to remove the disabled hairstyles from the avatar by Deleting the Prefab or adding a VRCFury Component to delete on upload
Don’t worry! All of the hairstyles are still available in the Prefab “Shia Bunnia - VCC” Just drag and drop the prefab into your scene again, or if that has been edited, drag and drop the prefab
SB_Hair_Preffrom thePackages/Shiapra - Shia Bunnia/Hair and Cheek Fur/Hairfolder directly onto your characters hierarchy.
Avatar Descriptor
The Avatar Descriptor intentionally has the Blink, Playable Layers, Menu and Parameters left blank! These are added via a VRCFury script separately so you can add your own layers here!

The Blink is controlled by a custom blink controller and should not be added unless you remove the custom controller entirely.
Next
Once you’re ready to upload, Visit Uploading Your Avatar if you need help. Otherwise check out FAQ
